

So far, we've seen how to prepare a finished piece of needlework for framing, and how to finish it with the lacing method. Today, it's the pin method.
The Pin Method
The pin method is just what it seems, using straight pins to pin into a piece of foam board. This is quicker than the lacing method, but it's harder to do any adjusting once it's pinned. I used a very small needlework to do this with, and I highly recommend that for your first pinning job. It makes it very easy!
You'll need :
Your finished cross stitch piece
A piece of foam board, cut to size needed (I used 1/2 thick foam board...it's what I had!)
Thumb tacks or push pins, and Straight pins (with a flat head)
Ruler

Measure and Cut
Cut your foam board to the size needed to fit in your frame. (I use an old rotary cutter for this.) If your needlework needs to be trimmed, do it now. Have your thumbtacks or push pins handy.
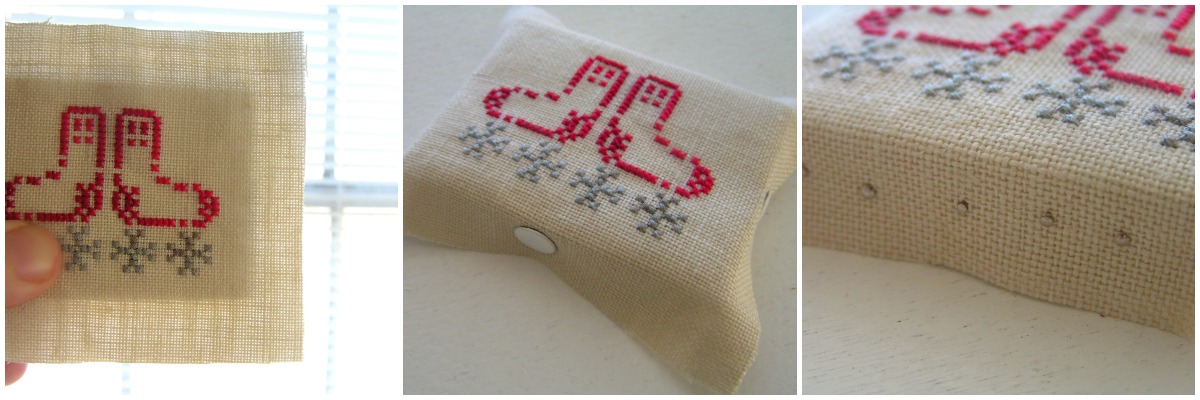
Center your cross stitch piece on the foamboard. I held mine up to the light. Place a thumbtack in the center of each side as shown above (this is to temporarily hold it in place).
Pin Away
Begin placing pins about every 1/4 inch or so along each side, removing the thumb tack last and replacing it with a straight pin. Do this all the way around your board, taking care to smooth and stretch the fabric as you go. Make sure you don't pull too hard on one side, or you'll slightly pull your design off center.

Fold and Frame
Everything should be pinned, except the corners. Fold the corners around to the side and pin, as shown in the photo above.
It's ready for your frame. If your foamboard keeps the back of your frame from fitting, you can cover it with brown kraft paper. Place double sided tape around the edge of the frame, lay the paper down and trim the edges. This will keep the dust out.
Or, if you're like me, you might be switching these out for different designs, and you're not too worried about the back! Just don't let anyone peek back there.
No comments:
Post a Comment